In modern web development, leveraging a backend-as-a-service (BaaS, often referred to as „backendless”) platform like Appwrite allows developers to focus more on crafting the user experience while minimizing backend complexities. This guide demonstrates how to build a backendless application using Angular and Appwrite.
What is Appwrite?
Appwrite is an open-source backend server designed to make web, mobile, and Flutter application development faster and more secure. With Appwrite, you can handle authentication, database, storage, and more without writing extensive server-side code. Appwrite’s modular architecture and community-driven ecosystem make it highly adaptable for various use cases.
Step 1: Set Up Your Appwrite Server
You can create a private server and go through the installation process from there, or for ease of use, do a one-click installation. Currently, some providers such as DigitalOcean, Gitpod, Akamai Compute, and AWS Marketplace support easy installation for Appwrite. Gitpod is free to use to get started and gives you 50 hours of free use per month with no credit card restrictions. That’s enough to test out Appwrite. After logging into your GitHub account, the installation process will start in a few clicks and will be completed in a few minutes.

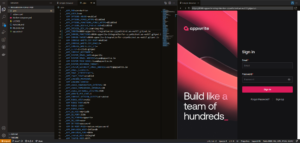
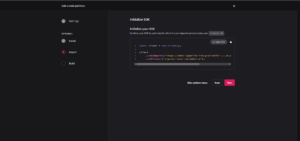
If you prefer, you can use the professional IDE installed on your device, or you can use the Gitpod cloud code editor. To do this, you can click on the More Actions button and then select the Open In Browser option. If everything is correct, you should see a page similar to the one in the image. The most important files are .env and docker-compose.yml. It is recommended to read these two files very carefully.

For example, _APP_CONSOLE_WHITELIST_ROOT is a very important option that you should set in the .env file. According to the Appwrite documentation, this option allows you to disable the creation of new users on the Appwrite console. When enabled, only one user will be able to use the registration form. New users can be added by inviting them to your project. By default, this option is enabled.
If this option is not set correctly, your service will be available to other users and your server resources will be wasted. For other options, it is recommended to refer to the Environment variables documentation on the official Appwrite website. Let’s go through the steps and leave it for later. Now it’s time to focus on the initial setup.
After completing the registration form, my information will be stored in the database and I can use Appwrite, which I have installed on my personal server.

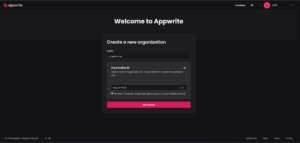
To start, you need to define an organization. This can be your company name or a unique ID. Each organization has a name and an ID. You can change its name, but its ID cannot be changed. If you don’t specify an ID, Appwrite will register a unique ID for that organization.
Every organization has projects. Now you need to create a project for your work. This is exactly the project you are working on. Just like organizations, projects also have a name and ID, and only their name can be changed in the future.

For me, this is the most interesting part. We are using Angular and Angular focuses on the web. So, we need to click on Web in the Add a platform section to be redirected to an exciting page.
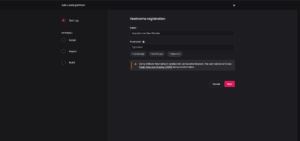
In this step, I will select the Name and Hostname of my Angular app. Note that I am currently using a shared hosting service, which is why I have selected this Hostname. If you have a dedicated domain for your use (for example, angular.love), you will need to enter it.
Appwrite has an official client package to speed up development. This package can be installed via NPM and is very easy to use. A CDN option is also available but not recommended.
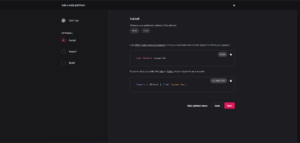
This is the last step. After installing the NPM package on the Angular project, the server where Appwrite we are working on needs to be introduced to the package. For this, we will use the following configuration.
Now we have an exciting backend, with a lot of features and it’s also very easy to learn. But that’s not enough. We need to do a real task with Appwrite and Angular, and you can see it later in the article.
Step 2: Integrate Angular with Appwrite
Having established that your Appwrite server is up and running it is now time too integrate it with your angular application. This lesson is on user authentication and, therefore, you will be learning steps of how to go about it. Here you will learn how the authentication process looks like, including descriptions of the texts and pictures for integrating it into your application.
Although Appwrite provides features like file storage, push notifications, messaging services, their own Database, server-side scripts, and many more, still, this guide will be focusing on the authentication feature. For other features, you may refer to Appwrite’s documentation or maybe future tutorials in this series.
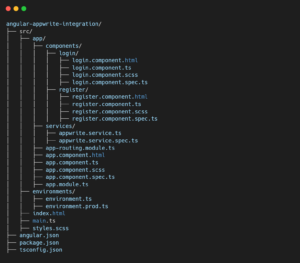
Below is the structure of the Angular application we’ll be working with. If you get stuck at any point, revisit this section to locate the specific file you need to modify.
Let’s start from the beginning. The first step to creating any dream using Angular is to create a project.

We have installed and configured Appwrite on our server, but we haven’t used its SDK in Angular. Now we need to download the Appwrite package from NPM.

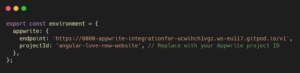
To introduce my personal server to the Appwrite package, I need to define the necessary URLs in the environments file.
For this, I use the following command to create my environment files.

My configuration is set up like this. You can do it however you like.
This is not necessary, but I prefer to create a dedicated service for my project to keep the code clean and have easy access to the desired methods, through which I can call Appwrite methods.
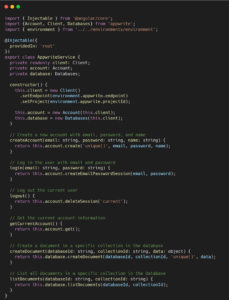
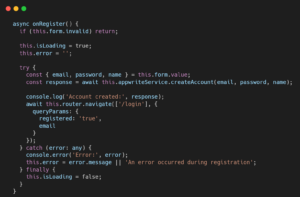
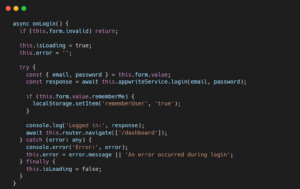
Currently, only createAccount and login are used. The others are for educational purposes only. Of course, this list does not include all methods. These two methods are imported into the RegisterComponent and LoginComponent components, respectively.
Benefits of Combining Angular and Appwrite
- Reduces backend complexity
- Speeds up development time
- Lowers costs for startups and small teams
- Provides secure and scalable solutions
- Offers flexibility through modular features
Challenges and Best Practices
In this chapter, we explore common challenges faced when using Appwrite and provide actionable best practices to address them effectively. Below is a concise list of problems paired with their recommended solutions to help navigate these issues with confidence.
Scalability management for high traffic
-
- Using a content description network (CDN) system like Cloudflare
- Using cache to temporarily store frequently used data
- Using data preloading
- Implementing Lazy-loading in Angular
Ensuring data security against external attacks
-
- Using TLS to encrypt information
- Prevention of DDoS attacks is possible through CDN and internal Appwrite settings.
- Change database passwords
- Closing unnecessary ports
- Setting permissions at all levels of the system.
Coordination with large data resources
-
- Using Search Optimization Features in Appwrite
- Implementing Efficient Caching Strategies for Data
- Using Database Indexing Capabilities
- Using Virtual Scrolling in Angular for Large Lists
Managing users and access levels
-
- Setting access levels in collections for each database
- Setting access levels for each function
- Using Appwrite’s built-in antivirus and applying permissions to buckets
- Be careful in creating private keys and setting the necessary access permissions for each of them.
- Using Environment Variables to store important data such as third-party API tokens
Difficulty in implementing advanced authentication
-
- Almost all important authentication services are available in Appwrite. Therefore, implementing an authentication service and managing users has become very easy.
- If your project requires a custom and complex login structure, the Custom token login feature in Appwrite is very useful.
- If the user login and logout process is not managed properly, your users may encounter a 401 error from Appwrite after each successful login. This means that there is currently an active session and it is not possible to create a new session.
- Using TLS is essential. If it is not used, some information will not be loaded by the browser and the login process will encounter an error.
Difficulty in managing user status and information
-
- You can always edit any of the user information and there are no restrictions on that. This can be an ideal option if you have developed your own dashboard, but the default Appwrite dashboard is also available (although not recommended for permanent use).
- If you need to perform large queries on your database, it is better to query your database. Behind the scenes, Appwrite uses MariaDB to manage data.Also Redis plays a very important role for operations such as queuing and caching.
Lack of precise analytics capabilities for data
-
- You can take full advantage of Appwrite’s built-in dashboard to review information, for example:
Database Overview
- You can take full advantage of Appwrite’s built-in dashboard to review information, for example:
-
-
- Total number of databases
- Full details for each database
Collection Overview
- Total number of collections
- Full details for each collection
User Statistics
- Total number of users
- Number of online users
System Metrics
- Number of requests
- Bandwidth usage
-
- For system issues, you need to use Docker and Docker Compose. You should be prepared to use the CLI for complex errors. Your problem may be solved with a simple reset, but sometimes you need to look at the logs in more detail. This happened to me when TLS was not issued for my domain and after looking at the logs I saw that Let’s Encrypt was issuing Too many requests.
Challenges in upgrading and maintaining backend services
-
- When you use a proprietary system, you have complete control over it, making this update easier for you because you know exactly which parts of the program you need to change and what the benefits and consequences of changing it will be. For systems like Appwrite that are not proprietary, this is very risky. It is important to make a backup of your system before making any changes. It is better to backup the entire operating system.
- Data migration is also a huge challenge. The Appwrite migration system almost always fails. But even if it is successful, you have a lot of negative effects. For example, the dates of an item’s creation in the database or its update are reset. Some functions, collections, or buckets may be imported incompletely, and this is very common. The solution is to take a manual backup. If you take a manual backup of Appwrite using Docker, the problems will be reduced.
- You can implement very unique features in your system using the Functions feature in Appwrite. Support for many programming languages and easy implementation of functions will help you a lot. But if you want to edit the Appwrite core, it is very difficult.There are two general solutions for this.
- Get a fork of Appwrite and customize it (not recommended)
- Submit your request to the Appwrite community, which takes time.
Problems in implementing and using custom APIs
-
- Let’s start this section with an example. Appwrite supports authentication using OTP code by default. In this way, an SMS is sent to the user’s mobile phone and the user enters it. Then the authentication process is done and the user registration is completed. But at the time of writing, there was no solution to announce the code via voice call. It is difficult for you to edit the Appwrite core and add this feature to it. The solution to this problem is to use functions in Appwrite. In the section above, we mentioned the Custom token login feature, which is the solution to this problem.
- One of the advantages of Appwrite is that it allows you to access your functions without using the proprietary Appwrite SDK. To do this, you assign a subdomain to each function and set its access levels. Then you can use your function via an HTTP request.
Need for specialized training to use backend services
-
- When we use a new tool, we have to learn it. Appwrite is easy to learn but it takes time and that means it costs organizations money. This cost doesn’t just include training the organization’s workforce. A lot of code needs to be changed. Depending on the situation of your company or team, you need to decide which one is best for you.
- Simple concepts don’t require complex solutions. If you’re trying to implement a simple to medium website that lacks complex logic, you’ll probably never encounter the problems mentioned in this article.
Conclusion
Developing a backendless application with Angular and Appwrite is easier while delivering great speed and scale. With Appwrite’s services and Angular’s UI, developers can build efficient, well-structured web applications faster.
To see the comprehensive source code and method involved in combining Appwrite with Angular, head to their GitHub Repo: AngularAppwriteIntegration.
It contains a standalone application that demonstrates how to quickly set up an Appwrite backend for an Angular application. The codes are readily available for you to use and improve!